
 IntroductionThe Bandit is a compact full range speaker that provides a relatively flat response and decent bass extension for a 4" driver. The f3 of the Bandit design is 72 Hz according to simulations. I designed two different cabinet designs for this driver, one is a ported design using dual 1" ports and the other is a dual-reflex design that has some additional benefits. I ended up building the dual-reflex version. I think that these would make excellent budget speakers to be used in a surround sound system that should easily outperform most "home theater in a box" systems costing more. I built three Bandits to be used a supporting center and surround speakers to convert a typical stereo system into a 5 channel surround system. I estimate that a pair of Bandits unfinished would cost about $130 and for a few bucks more you can use some Parts Express vinyl laminate to cover them nicely.Drivers Specifications: Power Handling: 25 watts RMS/50 watts max *VCdia: 1" *Impedance: 8 ohms *Re: 6.8 ohms *Frequency range: 75-20,000 Hz *Fs: 75 Hz *SPL: 89 dB 1W/1m *Vas: .21 cu. ft. *Qms: 1.50 *Qes: .48 *Qts: .37 *Xmax: 3 mm *Dimensions: A: 4-15/16", B: 3-3/4", C: 2-5/8". Cabinet DesignI've gone through several different cabinet designs so far and have finally arrived at a design that I'm satisfied with. I've actually arrived at two designs, a ported design and a dual-reflex design. The cabinets will be slightly different in shape between the two with the dual-reflex design being taller and shallower. The Bandit cabinet is made entirely from 1/2" MDF. All of the 1/2" boards can be cut from a single 4'x2' piece of 1/2" MDF as shown in the board diagrams. I plan to use a piece of 1/8" Masonite to flush mount the drivers by cutting out a frame panel to be applied on the baffle. You could omit the masonite and use a router to flush mount the driver but there are some advantages to using a piece of masonite... it covers up the board edges, provides a smoother front baffle finish and provides a slightly stronger, thicker baffle. I decided not to chamfer the inside edge of the driver opening because it would weaken the driver mounting and instead cut the driver hole slightly larger to increase the air flow. There is a 1/2" roundover on the sides of the baffle only, not the top or bottom. I did this so a single piece of vinyl or thin veneer could be wrapped three quarters of the way around the entire cabinet from side to side. With one roll of PE vinyl laminate you can finish 5 cabinets. The cabinets should be lined with 1/2" Sonic Barrier foam lining. I chose to use a round terminal plate because it allows you to align the binding posts for either vertical or horizontal cabinet placement by rotating the plate by 90 degrees.Ported Version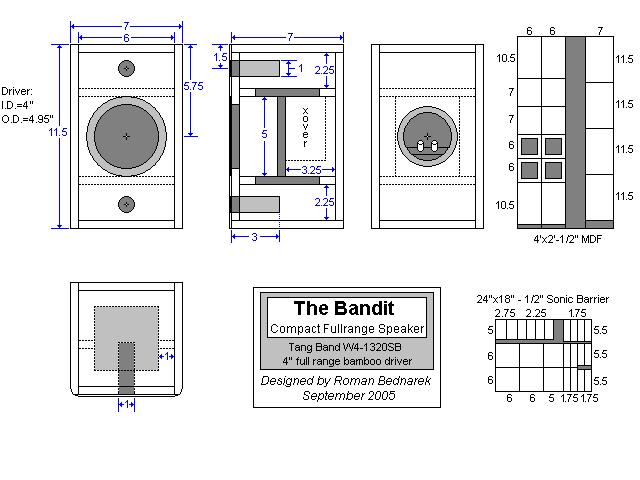
Dual-Reflex Version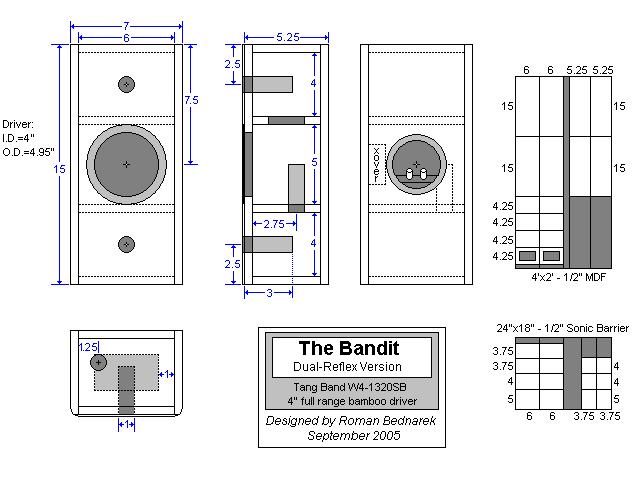
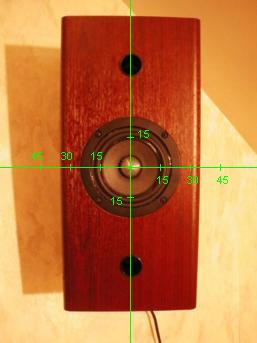
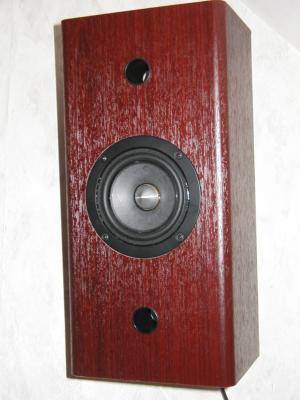
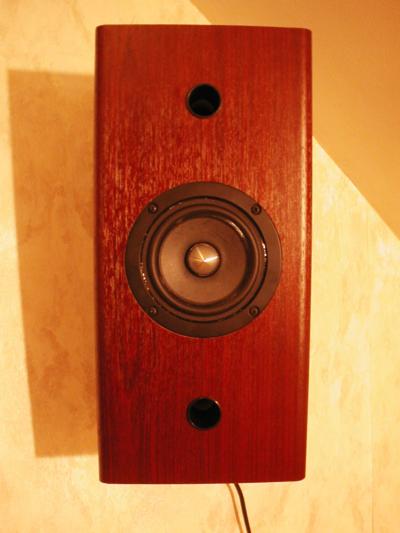
Due to the multi-compartment design there are actually three different port frequencies with this design. The port frequencies for this design are 67 Hz, 75 Hz and 150 Hz. I'm not sure what the response or f3 is because I don't know how to simulate this type of design but it should have some advantages. Due to the additional higher tuning it helps prevent the cone from reaching its excursion limits in the region just above the original port tuning and now I would say that they should be able to handle their rated 25 watts down to just below the original port tuning. Also this reduction in excursion above the original port tuning should reduce the amount of distortion in that range and I'm sure there are some additional benefits. There is additional information on how to build this type of cabinet at The Subwoofer DIY Page and more detailed information about the theory behind this type of cabinet at Claudio Negro's Homepage if you are interested. Below is a picture of the dual-reflex cabinet taken with the camera flash off so it has a different hue than the picture at the top of the page which was taken with the flash on. Next to that picture is a picture of the inside of the cabinet with the foam in place. Instead of using 1/2" Sonic Barrier inside I ended up using some leftover 5/8" foam that I purchased from Madisound a while back. 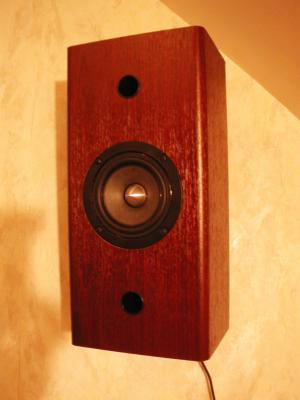 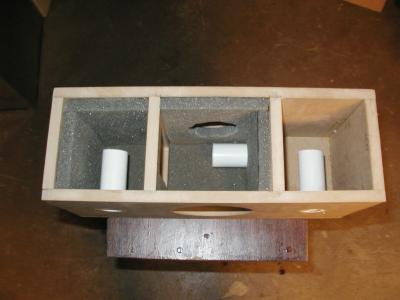
Driver and Cabinet measurementsSince this is a fairly new driver it seems that I received some of the earlier production models because the serial numbers on the units that I received from Parts Express were 9, 10 and 16. I measured each driver in the dual-reflex cabinet and noticed that the responses varied quite a bit, especially in the high frequency range. There is a plot below of the gated measurements of each driver taken at a distance of 0.5 meters and you can see that both the impedance response and frequency response varies between models.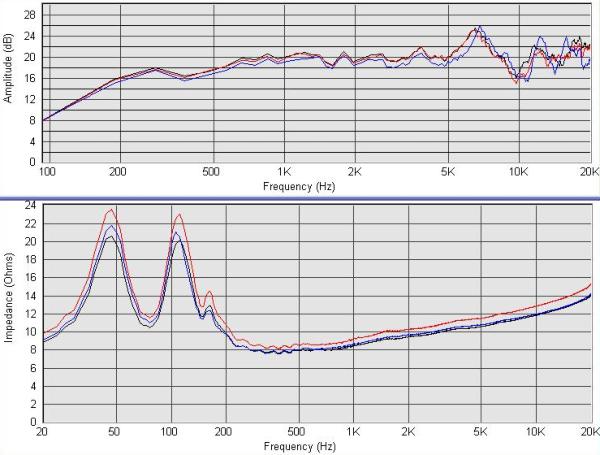
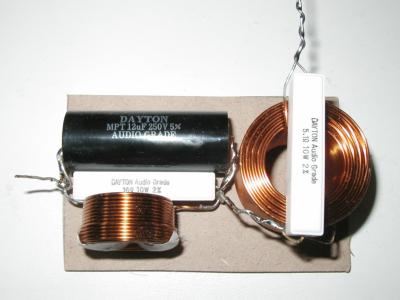
Crossover Design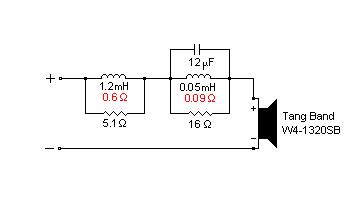
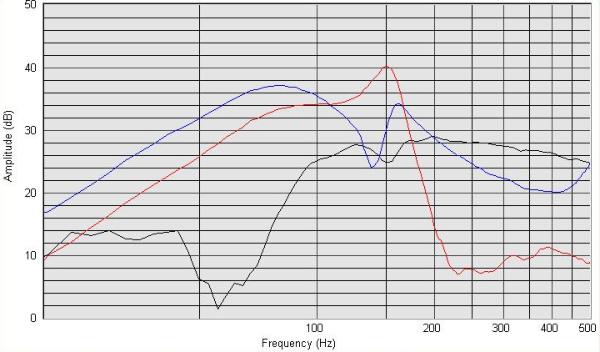
PerformanceAll of the measurements posted from this point forward are for the final Bandit design using the Tang Band W4-1320SB serial number 16 driver. The plot below shows the gated frequency response measurement taken at a distance of 0.5 meters.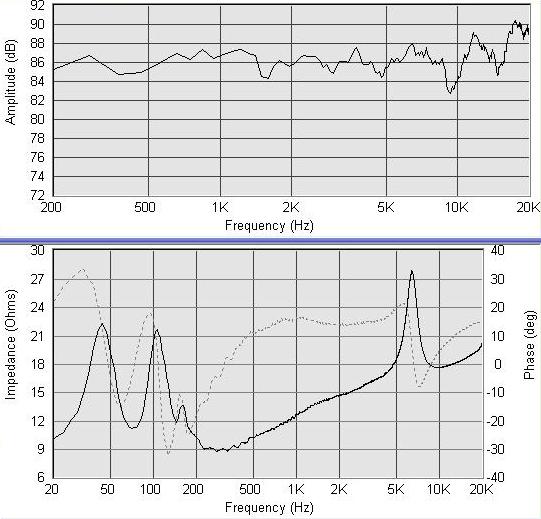
Unlike the earlier plot which was measured at a distance of 0.5 meter, these measurements were taken at 1 meter. As you can see from the diagram above the response isn't too bad when you move 15 degrees off axis but when you get beyond 30 degrees the high frequencies disappear. This is due to the size of the cone because as the wavelengths get shorter than the cone diameter they begin to cancel off axis and the driver becomes very directional. This will happen with any driver of this size. A three inch driver will even suffer a lot of these problems but it will occur slightly higher in frequency due to the smaller cone. This is the main deficiency of this design because if you listen off axis the high frequencies literally disappear. The vertical off axis response is slightly different than the horizontal off axis response because the baffle diffraction effects are different along that axis since the baffle is longer in that direction. I don't have any plots of the low frequency response because I couldn't find a way to get good measurements. If I tried to take nearfield measurements of the ports and driver and add them together I couldn't get accurate results because the port measurements include some of the driver output due to their close proximity to the driver. If I tried to take ungated measurements at a distance of 0.5 meters I could get the combined response of the ports and the driver but then the room reflections would still creep in below 300 Hz and cause some dips and peaks that aren't representative of the true anechoic response of this design. So I decided not to post any plots of the response below 200 Hz and you'll have to trust my impressions of the sound in that region. I did however take some in-room SPL measurements of the speaker and was surprised at how deep they played in my little room. With my Radio Shack SPL meter and the speakers placed 2.5 feet away from the back wall I was able to get a flat bass response all the way down below 70 Hz. I measured the -3 dB point to be in the low 60s and the -10 dB frequency to be in the mid 40s. The average room has a height of 8 feet translates to a room mode of 70 Hz which is right where this design theoretically rolls off so the room mode helps to reinforce the output of the speaker in this region. Another common room dimension is 12 feet (which is one of the wall lengths of my test room) and this length corresponds to a room mode of about 50 Hz which is past the point where the driver's response has dropped off quite a bit but there is still a little bit of reinforcement in that range. My estimate of the anechoic f3 of this design is probably around 70 Hz due to the dual-reflex port tuning. Listening ImpressionsEnough of the plots and measurements and onto the stuff that really matters... how do they sound? I designed the crossover with the speakers away from the rear walls by 2.5 feet with them separated by 5 feet at a listening distance of 6 feet. With this listening arrangement they tend to sound a bit thin overall with the midrange on the lean side. However my final arrangement for these speakers was to place them near the walls which really helps to fill out the midrange and bottom end. The crossover is adjustable for different baffle step compensation levels but I ended up finding a good compromise that allows them to sound decent away from the walls as well as against the walls although the ideal positioning is probably about 1-2 feet away from the back wall. After some experimenting with the crossover I realized that there was no way to increase the baffle step compensation for the best sound away from the walls due to the limited number of crossover components because you only have two variables to work with, the inductor and the resistor. If you increase the inductor size the response dips in the 200 to 800 Hz region and if you increase the resistor size the response drops above 2 kHz. So adjusting both components leaves you a peak in the response in the 800 Hz to 2 kHz region which makes the midrange sound too strong. You could add a series RC circuit in parallel with the baffle step compensation circuit to adjust this peak but I didn't want to add any more components and I found a good compromise with the current crossover that sounds fine to me.Now back to my listening impressions. When listening to these speakers the first thing I noticed is how clear and detailed the midrange is. They are not quite as neutral as some of my three way designs but they have a very clean sounding midrange that will easily outperform any HTIB (Home Theater In a Box) system. If I didn't know that the cones were a bamboo/paper composite I would swear that these were metal cone drivers due to the midrange clarity. They have a lot of similar properties to metal cones in the fact that they really sound great with a nice clean recording but can get a bit harsh with poorly recorded material. The imaging is very focused and precise. The soundstage isn't too deep but it is very wide. The highs are surprisingly clear as well with a slight bit of brightness at the top end that gives them a bit of sparkle. This brightness can be seen in the on axis measurements but isn't fatiguing at all and is kind of nice because it evens out the power response a bit due to the high frequency roll off as you move off axis. The only reason I might add a tweeter to this design would be to improve the off axis performance but if you are listening on axis I think the highs are fine. The bass response is very good considering the small size of this driver and I think the dual-reflex cabinet design does a great job of improving the bass extension. The bass response is very even until you get below 70 Hz where it rolls off. I think part of the reason that the bass is so flat is due to the fact that most of the room modes that can introduce peaks and dips in the bass response are below the point where the response begins to roll off. Despite the fact that the dual-reflex ports are providing output at three frequencies (67 Hz, 75 Hz, and 150 Hz) the balance of the bass in this region is quite good. The bass isn't nearly as clean as some other designs that use larger drivers due to the fact that you begin to get some harmonic distortion in this region from such a small driver trying to reproduce those notes but they'll work great with a subwoofer if you cross them in the 100-120 Hz range. To get the best performance you really need a subwoofer to extend the low end response but they don't sound bad just by themselves. I'm currently using three Bandits in a supporting role as center and surround speakers in my system. With my Alpheus speakers as mains the Bandits do a great job of filling in the extra channels despite the fact that they aren't perfectly matched. This setup works decent for multichannel audio but I've found that it is best to have all 5 identical speakers in order to preserve the imaging characteristics between the different channels. I have a Marantz SR4500 multichannel receiver with the Bandits set to "small" and a crossover frequency of 120 Hz which diverts the bass to the main speakers. So to summarize, the Bandits are a very nice sounding speaker design that will easily outperform any HTIB speaker systems. Their only downfall is their poor off axis performance at high frequencies but if you listen on axis they sound great. The only other issue is the poor quality control with the Tang Band drivers but even when I used the mismatched drivers as a stereo pair the imaging wasn't bad at all. I'd like to thank Wolf for suggesting the dual-reflex cabinet design because I think it worked out great with these drivers. Listening at a distance of 6 feet these speakers can easily reach levels of 90 dB measured with my SPL meter but I didn't want to turn them up any louder for fear of hurting my ears and they begin to get a bit harsh beyond that point. I think this design would be a great replacement for cheap HTIB speaker systems and I estimate that you could build a complete set of five for under $350 total. They would also work well as surround speakers in a supporting role with some high end front speakers. I'm very happy with mine and think they work great in my system. Now I can say that I've built and heard a single driver fullrange system and despite its limitations I'm impressed. Parts List
  |